TL;DR
A closet rig works best for vocal and close-mic recordings when you focus on absorption, mic placement, and controlling reflections, rather than full soundproofing. Proper ventilation and strategic placement make all the difference in clarity and noise control.
Ever tried recording vocals in a tiny closet? It can sound surprisingly good—if you know how to treat the space without turning it into a full studio. Most people think the secret is soundproofing, but actually, it’s about controlling reflections and placement.
This guide reveals how to turn your closet into a quiet, clear, and effective workspace for voice-over, podcasting, or even AI workstations. You’ll learn where to put absorbent materials, how to position your microphone, and the ventilation tricks that keep your gear cool—without turning your closet into a furnace.
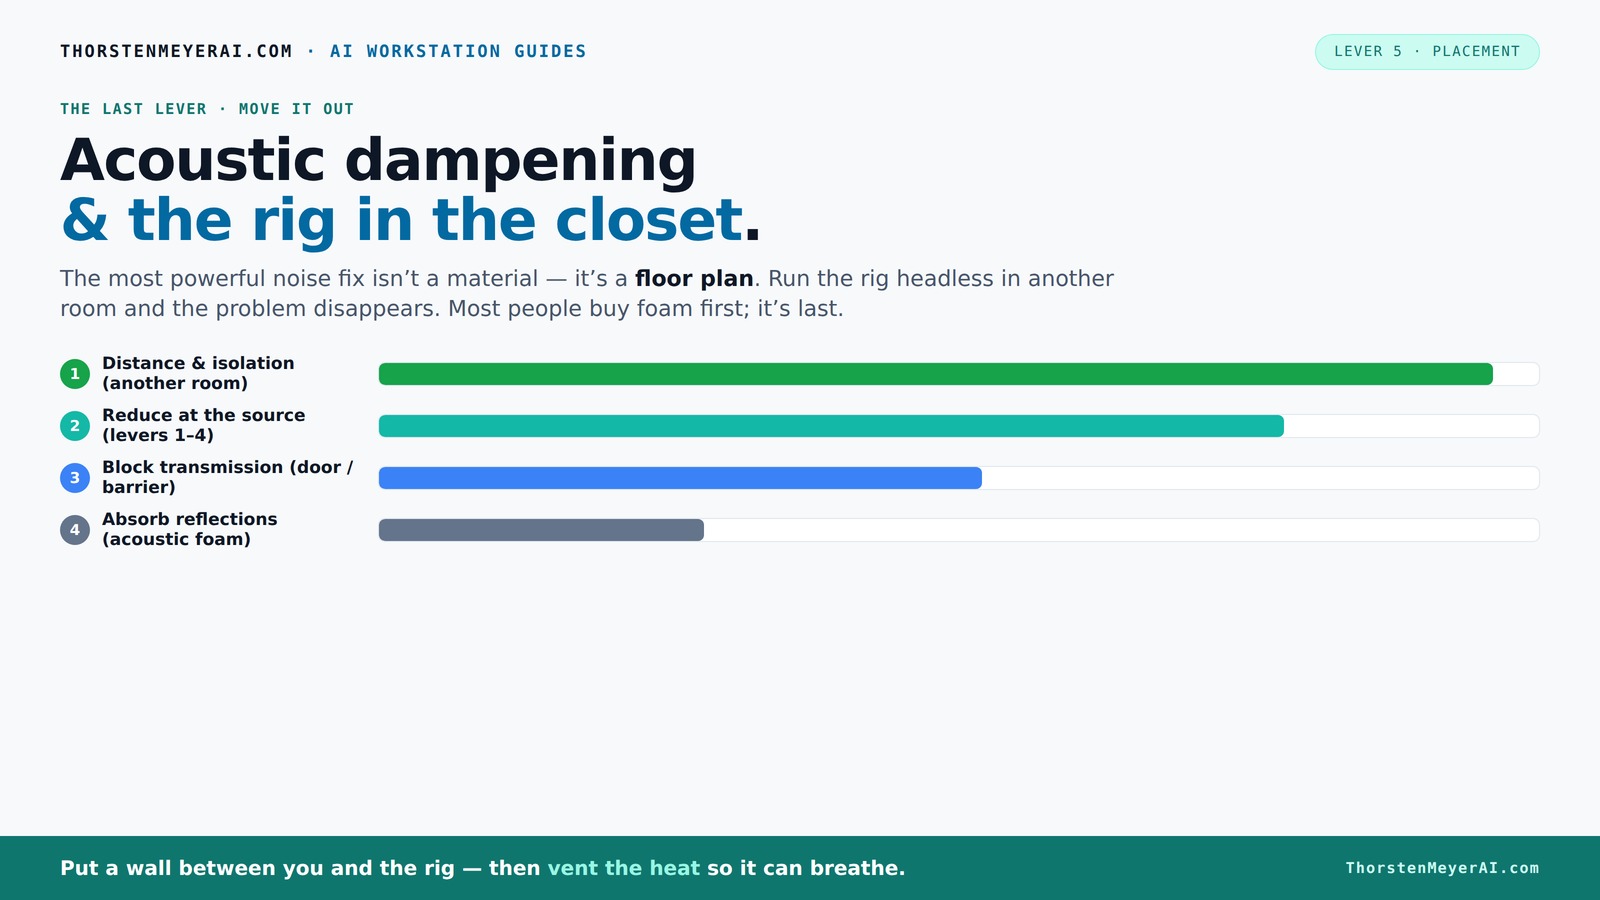
Acoustic dampening
& the rig in the closet.
The most powerful noise fix isn’t a material — it’s a floor plan. A rig you can’t hear because it’s in another room beats any amount of foam. Tap the approaches in Part 1 to see what actually works.
(another room)
(levers 1–4)
(door / barrier)
(acoustic foam)
Contain the noise, not the heat
Key Takeaways
- Focus on reflection control with strategic placement of foam and blankets, not just soundproofing.
- Use a combination of absorption and ventilation to keep your closet rig both quiet and cool.
- Identify reflection points with a mirror to maximize treatment efficiency.
- Corners need bass traps for low-frequency control; treat them early.
- A closet rig is ideal for voice-over, podcasting, and remote AI work—less about isolation, more about clarity.

Focusound 52 Pack Acoustic Foam Panels 1" x 12" x 12" Sound Proof Foam Panles Soundproofing Noise Cancelling Wedge Panels for Home Office Recoding Studio with 300PCS Double-Side Adhesive
Soundproofing - Acoustic foam panels triangular grooves structure for better noise absorption, helps to reduce and absorb unwanted...
As an affiliate, we earn on qualifying purchases.
As an affiliate, we earn on qualifying purchases.
Why Your Closet Is the Secret Weapon for Better Recordings
Closets naturally focus sound because of their small, enclosed shape. This makes vocals and close-mic recordings sound more direct and less echoey.
For example, a singer recording in a small closet can get a tight, warm tone without expensive studio gear. The key is to manage reflections and avoid the boxy, honky sound that small rooms often produce.
Remember, soundproofing isn’t the goal here; reflection control and mic placement are. This makes your closet a perfect, low-cost vocal booth when treated right.

Professional Studio Recording Microphone Isolation Shield, Pop Filter,High density absorbent foam is used to filter vocal. Suitable for Blue Yeti and other condenser microphones (AO-504 With Stand)
♪【The package contains】♪: Microphone Isolation Shield x 1, Metal Thread Adapter x 2 (Adapt most microphones), Adjustable Stand...
As an affiliate, we earn on qualifying purchases.
As an affiliate, we earn on qualifying purchases.
Acoustic Dampening vs. Soundproofing: What Really Matters in a Closet
Acoustic dampening is about reducing echoes and controlling reflections inside your closet. Soundproofing aims to block sound from escaping or entering.
In a tiny closet, adding foam panels, blankets, or rugs helps tame reverb and makes your recordings clearer. But these won’t stop noise from leaking out or external sounds from getting in.
For example, hanging blankets behind your mic reduces echo but won’t stop your neighbor’s dog barking. To block noise, you need a solid barrier and sealing around the door.
Understanding this distinction is crucial because many people waste effort over-soundproofing when reflection control alone can significantly improve recording quality at a fraction of the cost and effort. If your goal is clarity and focus rather than complete isolation, prioritizing absorption is more practical and effective.
RDCMKL XL Portable Recording Booth, Complete Home Recording Studio Soundproof Vocal Booth, Foldable with Travel Bag for Echo-Free Studio-Quality Sound, Ideal for Voiceovers, Podcasts, and Music
Transform your home studio with our complete home recording studio. This vocal booth offers clear, high-quality audio for...
As an affiliate, we earn on qualifying purchases.
As an affiliate, we earn on qualifying purchases.
Where to Place Absorbers and Panels for Maximum Impact
Placement is king when it comes to making your closet sound better. Start by placing foam or blankets directly behind your microphone to reduce reflections from the wall behind you. Sound dampening is essential for optimal results.
Next, treat side walls at reflection points—where sound bounces from your mouth to the wall and back. Use a mirror to spot these spots: if you see your mic in the mirror from your position, that’s a reflection point worth absorbing.
Finally, consider ceiling treatment for even more clarity, especially if your ceiling is flat and reflective. This targeted approach avoids wasting foam on areas that won’t affect your sound much.
Proper placement ensures that each piece of absorption material addresses specific reflection paths, preventing sound from bouncing around unnecessarily. This strategic approach results in a more controlled sound environment, making your recordings clearer and more professional.

8" Room to Room Air Transfer Fan for Quietly Circulating Air, Reversible Airflow Design, 320 CFM Programmable Through Wall Fan, Durable Build Quality, 10 Speed Thru Wall Exhaust Fan for Closet,Laundry
【QUIET, MOVE MASSIVE AIR】 This room to room fan quietly circulates air between two rooms to maintain a...
As an affiliate, we earn on qualifying purchases.
As an affiliate, we earn on qualifying purchases.
How to Handle Low-Frequency Buildup in Small Spaces
Low frequencies are the sneaky problem in tiny rooms. They cause a boomy, muddy sound that’s hard to fix with just foam panels. For more on managing noise, see Quiet GPUs for Local AI.
In a small closet, bass can bounce between walls, creating standing waves. To combat this, add bass traps in corners—these are thick panels designed to absorb low-end rumble.
For example, a DIY bass trap using rockwool or Owens Corning 703 can be tucked into closet corners to smooth out the boom, resulting in a more balanced vocal sound.
Ignoring low-frequency issues can severely compromise your recording quality, leading to muddiness and lack of clarity. Properly treating these frequencies ensures your vocals sound natural and balanced, avoiding the trap of a thin or overly boomy sound that can’t be fixed with standard foam panels alone.
Ventilation Hacks for a Closet Rig That Won’t Overheat
Putting a high-power computer or audio gear in a closet is a heat trap. Without ventilation, your rig will throttle or shut down. Learn more about ventilation hacks for a closet rig.
The solution? Create a simple airflow path. Use a small, quiet exhaust fan pulling hot air out and a vent opening on the opposite side for fresh air. This keeps temperatures stable and noise levels down.
For instance, installing a 120mm fan with a duct can exhaust heat while remaining quiet enough for voice recordings. Pair it with a thermostat if you want to automate temperature control.
Effective ventilation not only prevents overheating but also reduces the risk of humidity buildup, which can damage sensitive electronics over time. Proper airflow is essential for maintaining the longevity and performance of your gear in a confined space.
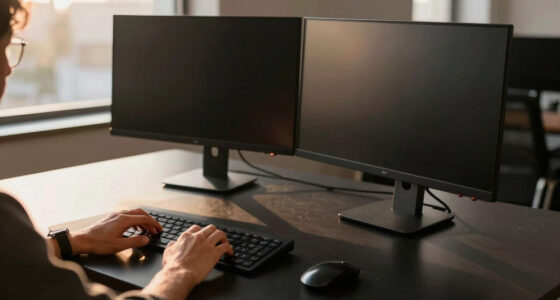
The ‘Rig in the Closet’ Setup: When and Why It Works Best
Imagine a setup where the entire AI or gaming rig lives in a closet, while you work comfortably outside. This is perfect for noise-sensitive environments or shared spaces. For detailed guidance, see the 'Rig in the Closet' setup.
For example, a developer using a remote inference rig can have their hardware in a closet, accessed via a fast network—no loud fans or GPUs ruining the vibe in the main room.
Plus, this approach reduces heat and noise at the source, making it easier to manage. Just remember: ventilation and network stability are key to success.
This setup is especially advantageous when noise or heat from the equipment could disturb others or when space constraints prevent a dedicated room. However, it requires careful planning around cooling and network cabling to ensure smooth operation.
Putting It All Together: Your Action Plan for a Quiet, Clear Closet Setup
- Place absorbers behind your mic and at reflection points on walls and ceiling.
- Seal the door with blankets or weatherstripping to prevent leaks.
- Install a quiet ventilation system to keep things cool.
- Position your gear in a well-ventilated, accessible corner of the closet.
- Test, tweak, and add bass traps or diffusers if needed.
Following these steps guarantees cleaner recordings and a quieter workspace, all without breaking the bank. Remember, each space is unique, so observe your room’s specific reflection patterns and adjust accordingly. The goal is to create a balanced acoustic environment that enhances clarity without unnecessary expense or complexity.
Frequently Asked Questions
Is a closet actually good for recording vocals?
Yes, a closet can be excellent for vocals because its small size and reflective surfaces naturally focus sound and reduce echo. Proper treatment with absorption materials improves clarity, making it a cost-effective solution for home studios.
What’s the difference between acoustic treatment and soundproofing?
Acoustic treatment reduces echoes and reflections inside a room, making recordings clearer. Soundproofing prevents sound from leaking in or out. In a small closet, focus on absorption and reflection control first—full soundproofing is usually unnecessary unless you need isolation.
Where should I place foam or panels in a closet booth?
Place foam directly behind your microphone, at reflection points on side walls, and on the ceiling. Use a mirror or test recordings to identify where sound bounces back toward the mic for maximum effect.
Do I need bass traps in a small closet?
Yes. Bass traps in corners help control low-frequency buildup that causes a boomy or muddy sound. They’re especially useful if your recordings sound boxy or uneven at low end.
How do I prevent my closet rig from overheating?
Install a quiet exhaust fan and create a vent pathway to keep hot air out. Use ducting if needed, and consider thermostatic control for consistent cooling. Proper ventilation keeps your gear happy and performing well.
Conclusion
Turning your closet into a mini studio isn’t about sealing it tight or filling every inch with foam. It’s about smart placement, effective absorption, and keeping your gear cool. With a few simple tweaks, your tiny space can produce big, clear sound.
Imagine a quiet corner where your voice shines, your AI runs cool, and you never have to shout over your own rig again. That’s the real power of a well-treated closet setup. Get started today, and let your small space do big things.